Record details View
User access permissions are assigned to almost every aspect of Collections from access to individual fields and records to functions such as record entry, deletion of records, location management and reporting. Unless authorized, users will not have access to many of the functions described on this page.
Roles and access rights are managed in Axiell Designer![]() A tool for designing, creating, customizing and managing Axiell Collections applications and databases, broadly speaking, the Axiell Collections Model Application. As well as managing databases, including user access and permissions, Designer is used for such tasks as translating field labels, tooltips, values in drop lists, etc.. An overview of Users and roles and User authentication and access rights is available here.
A tool for designing, creating, customizing and managing Axiell Collections applications and databases, broadly speaking, the Axiell Collections Model Application. As well as managing databases, including user access and permissions, Designer is used for such tasks as translating field labels, tooltips, values in drop lists, etc.. An overview of Users and roles and User authentication and access rights is available here.
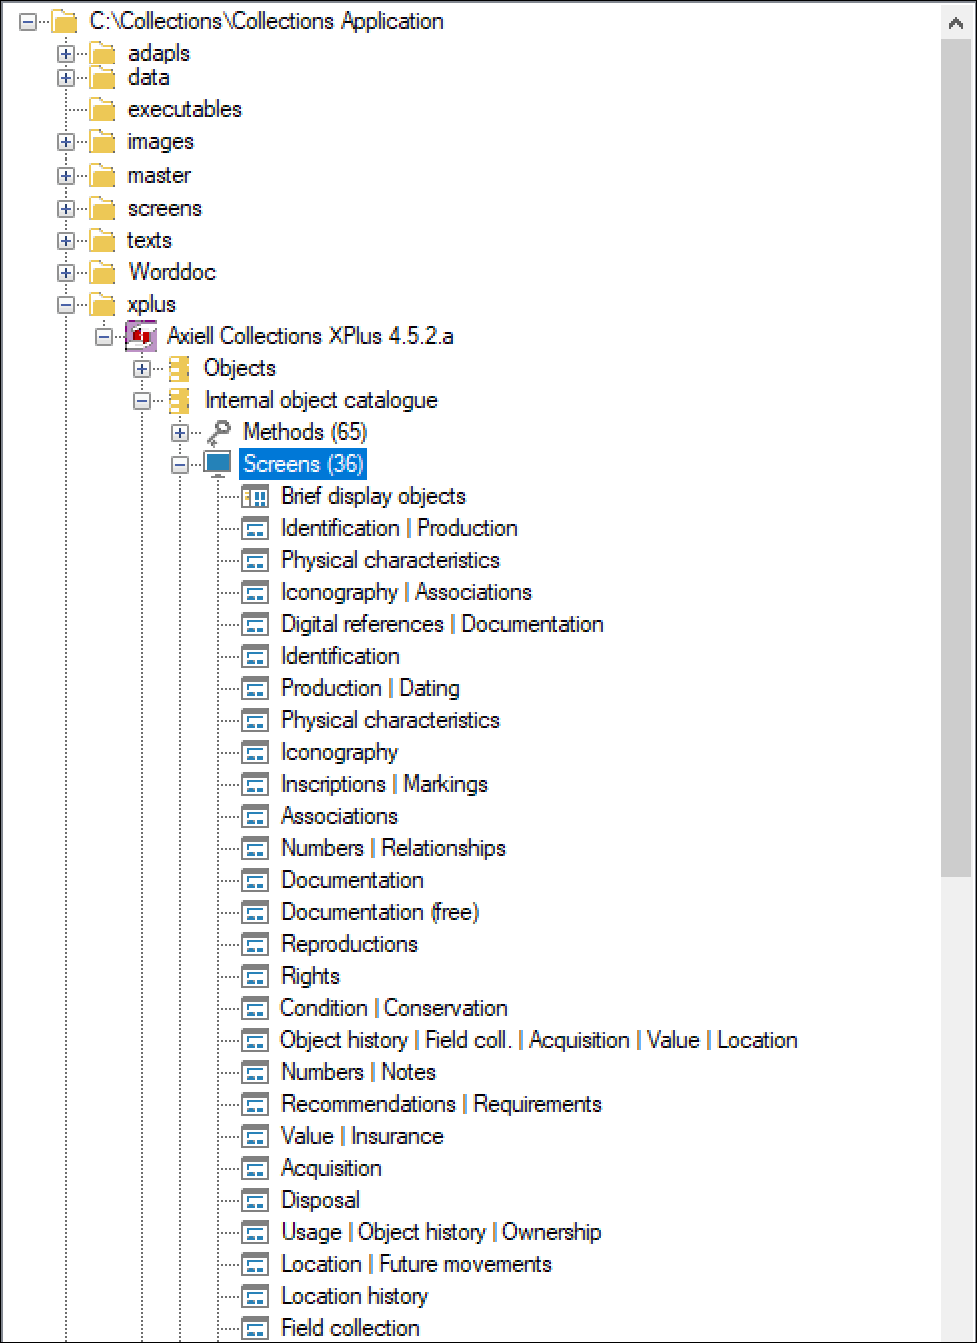
Each panel in Record details View is a screen added to the Screens folder of your Collections Application (XPlus for instance); the order of screens in the folder determines the default order of panels in Record details View:
See Axiell Designer Help for details about building and adding screens to your Collections application.
In some implementations of Collections users are able to edit records directly in Result set View by clicking an Edit  button in the Result set View toolbar (disabled by default in the Standard Model).
It is important to understand that when editing records in Result set View, Collections automatically saves an edited record without asking the user to confirm that changes should be saved whenever the user closes or leaves the edited record. In other words, the Save Prompt does not display (this is also true when clicking the Save record  button in Record details View).
If it is preferable that users always confirm their changes are saved, the Always prompt before saving option in settings.xml will restrict the ways an edited record can be saved to those that display the Save Prompt (it will not be possible to edit a record in Result set View):
<Setting Key="AlwaysPromptBeforeSave" Value="true" />
When disabled in Result set View, editing of records is always done in Record details View.
Details here.
A consequence of setting Always prompt before saving to true is that the Save  button does not display in the Record details View toolbar (the Result set View edit functionality and Record details View save functionality are linked). In this case, editing and saving of records in Record details View are both enabled by selecting the Edit
  button. The Save Prompt always display in Record details View when the Edit
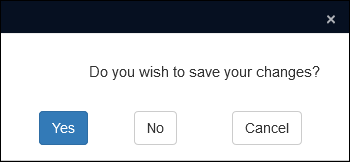
  button is clicked or a user leaves an edited record (by clicking another record in Result set View for example):
The The EnableResultSetEdit setting1 can be used instead of AlwaysPromptBeforeSave to disable editing in Result set View without also disabling the Save record button in Record details View:
<Setting Key="EnableResultSetEdit" Value="false" />
Details here.
Details about inherited values and how to configure a field to inherit a value from a record higher in a record hierarchy can be found in the Axiell Designer Help.
In a multilingual environment it is possible to specify at the system level that a language is an invariant, in which case values in the invariant language will display for every other available language until a translation is added. It is also possible to set an Invariant language manually on individual fields.
Details can be found in the Axiell Designer Help.
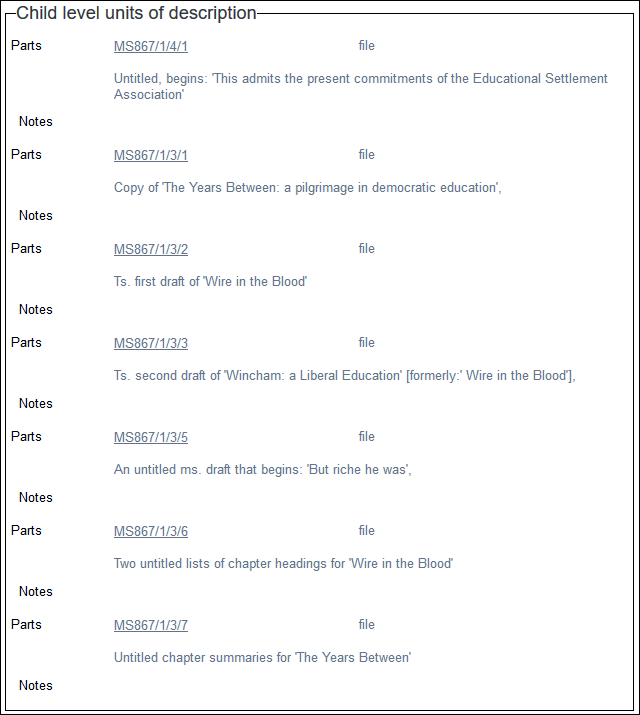
Opening a record that is linked to many other records can be slow as all links are resolved before the record is displayed. This is usually only a problem with a small number of linked fields. For example, the Parts field group on the Context (ISAD) panel in Archive (catalogue) records includes parts.reference (nt); in a large archive this field group can have hundreds of occurrences![]() If a field in the current record can have more than one value, we add an occurrence of the field for each value (e.g. a book can have multiple authors so we add an occurrence of the author.name (au) field for each author). An occurrence can be a member of a group of fields, and adding an occurrence of the field adds all members of the group at once., each one of which must be resolved before the current record
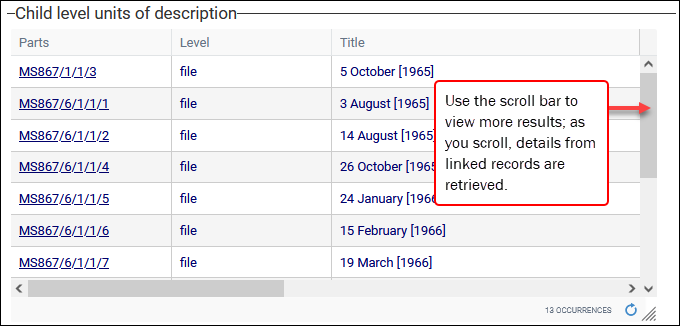
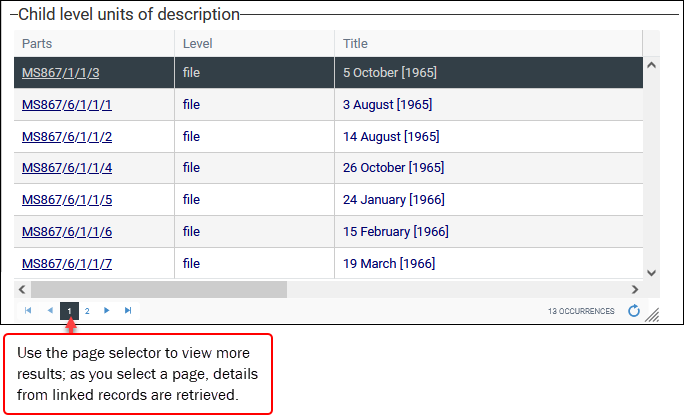
If a field in the current record can have more than one value, we add an occurrence of the field for each value (e.g. a book can have multiple authors so we add an occurrence of the author.name (au) field for each author). An occurrence can be a member of a group of fields, and adding an occurrence of the field adds all members of the group at once., each one of which must be resolved before the current record![]() The record currently displayed in Record details View or highlighted (with a solid background) in Result set View or Gallery View for instance. is displayed. A solution is to configure such repeated field groups to display as a table: details of linked records are then displayed as paged or scrolled results, and rather than retrieving all linked records at once, they are retrieved in smaller groups (one page at a time, or as you scroll through the results).
The record currently displayed in Record details View or highlighted (with a solid background) in Result set View or Gallery View for instance. is displayed. A solution is to configure such repeated field groups to display as a table: details of linked records are then displayed as paged or scrolled results, and rather than retrieving all linked records at once, they are retrieved in smaller groups (one page at a time, or as you scroll through the results).
In the Settings box, users can choose to display results in grids as pages or a scrollable list (more details below, including an illustration of how grids display in Record details View).
Details about configuring a screen to display grouped fields as a table / grid can be found in the Axiell Designer Help.
From Collections version 1.11 onwards Application Administrators control the availability of the Copy record and Record templates functions per data source![]() The management of a collection can involve a vast amount of information about objects / items / books, people and organizations, events, administration and more. This information is stored as records in data sources. Each data source stores a specific type of information: details about collection items, people, events, loans, and so on.. In earlier versions of Collections these functions are available in the Record details View toolbar in all data sources by default.
The management of a collection can involve a vast amount of information about objects / items / books, people and organizations, events, administration and more. This information is stored as records in data sources. Each data source stores a specific type of information: details about collection items, people, events, loans, and so on.. In earlier versions of Collections these functions are available in the Record details View toolbar in all data sources by default.
Details can be found in the Axiell Designer Help.
Record details View displays all available details of the current record![]() The record currently displayed in Record details View or highlighted (with a solid background) in Result set View or Gallery View for instance. following a search, the import of records, retrieval of records from a saved search, and so on. By default the current record is in Display mode
The record currently displayed in Record details View or highlighted (with a solid background) in Result set View or Gallery View for instance. following a search, the import of records, retrieval of records from a saved search, and so on. By default the current record is in Display mode![]() A record is either in Display mode (we view its details) or Edit mode (we add or edit its details). A record enters Edit mode as soon as we create a new record, copy a record in Record details View or edit an existing record..
A record is either in Display mode (we view its details) or Edit mode (we add or edit its details). A record enters Edit mode as soon as we create a new record, copy a record in Record details View or edit an existing record..
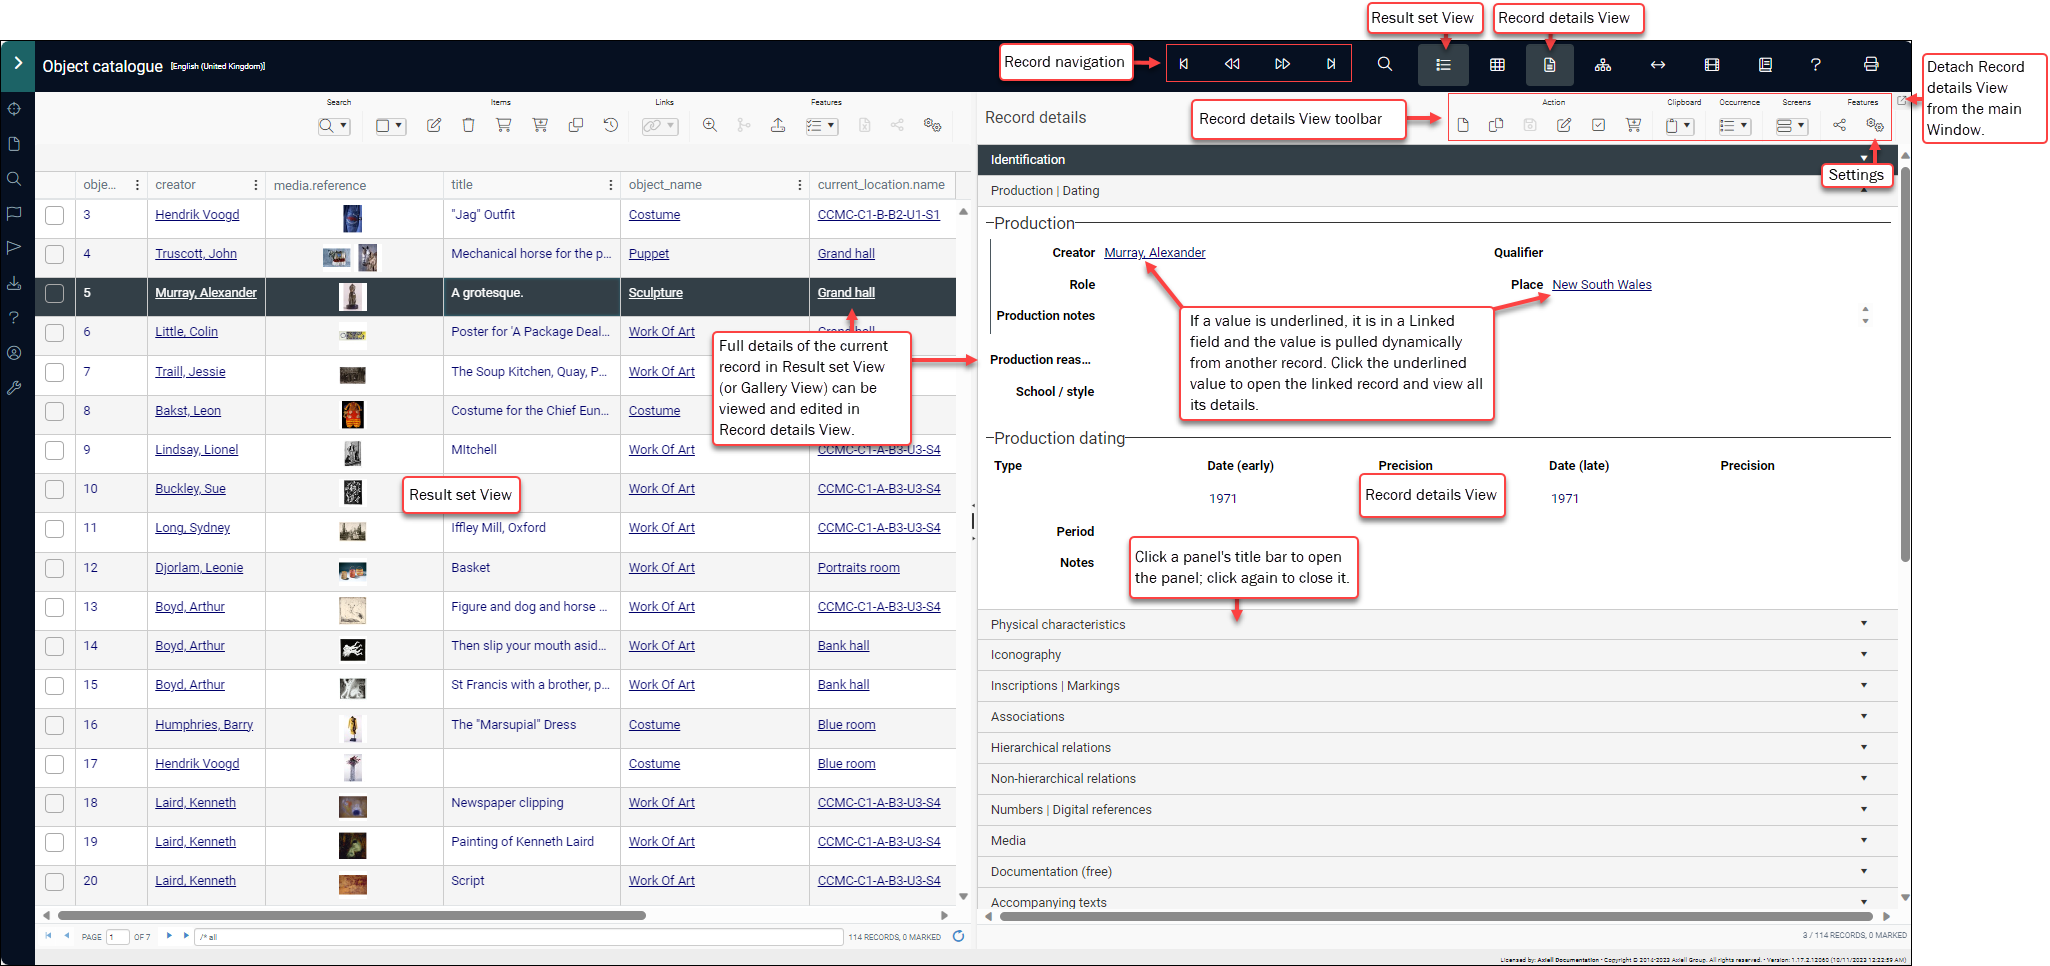
Record details View is displayed / hidden by selecting its button in the top Toolbar, and it opens by default when creating a new record. All fields you are authorized to view are arranged in logical groupings across a series of panels (aka screens or tabs). A default set of panels is specified for each data source![]() The management of a collection can involve a vast amount of information about objects / items / books, people and organizations, events, administration and more. This information is stored as records in data sources. Each data source stores a specific type of information: details about collection items, people, events, loans, and so on. but you can add / remove panels and reorder them by selecting Settings in the Record details View toolbar (you can also change the order of panels with drag and drop).
The management of a collection can involve a vast amount of information about objects / items / books, people and organizations, events, administration and more. This information is stored as records in data sources. Each data source stores a specific type of information: details about collection items, people, events, loans, and so on. but you can add / remove panels and reorder them by selecting Settings in the Record details View toolbar (you can also change the order of panels with drag and drop).
Authorized users are able to edit the current record![]() The record currently displayed in Record details View or highlighted (with a solid background) in Result set View or Gallery View for instance., to copy it and to add a new record.
The record currently displayed in Record details View or highlighted (with a solid background) in Result set View or Gallery View for instance., to copy it and to add a new record.
This view opens by default in the main Collections window, but it can be detached and viewed in a separate window:
A useful combination of Views is Result set View alongside Record details View: the current record is always the same in each View, so as you move from one record to another in Result set View (by clicking a record or using the Record navigation buttons in the top Toolbar), all available details for the current record will display in Record details View.
The Record details View Status bar shows the position of the current record in the result set![]() The records currently listed following a search, retrieval from a group, etc. (e.g. record 6 of 11 records currently listed)2:
The records currently listed following a search, retrieval from a group, etc. (e.g. record 6 of 11 records currently listed)2:

This can be useful if Result set View is closed: as you navigate through records in Record details View, the position of the current record in the result set is always indicated.
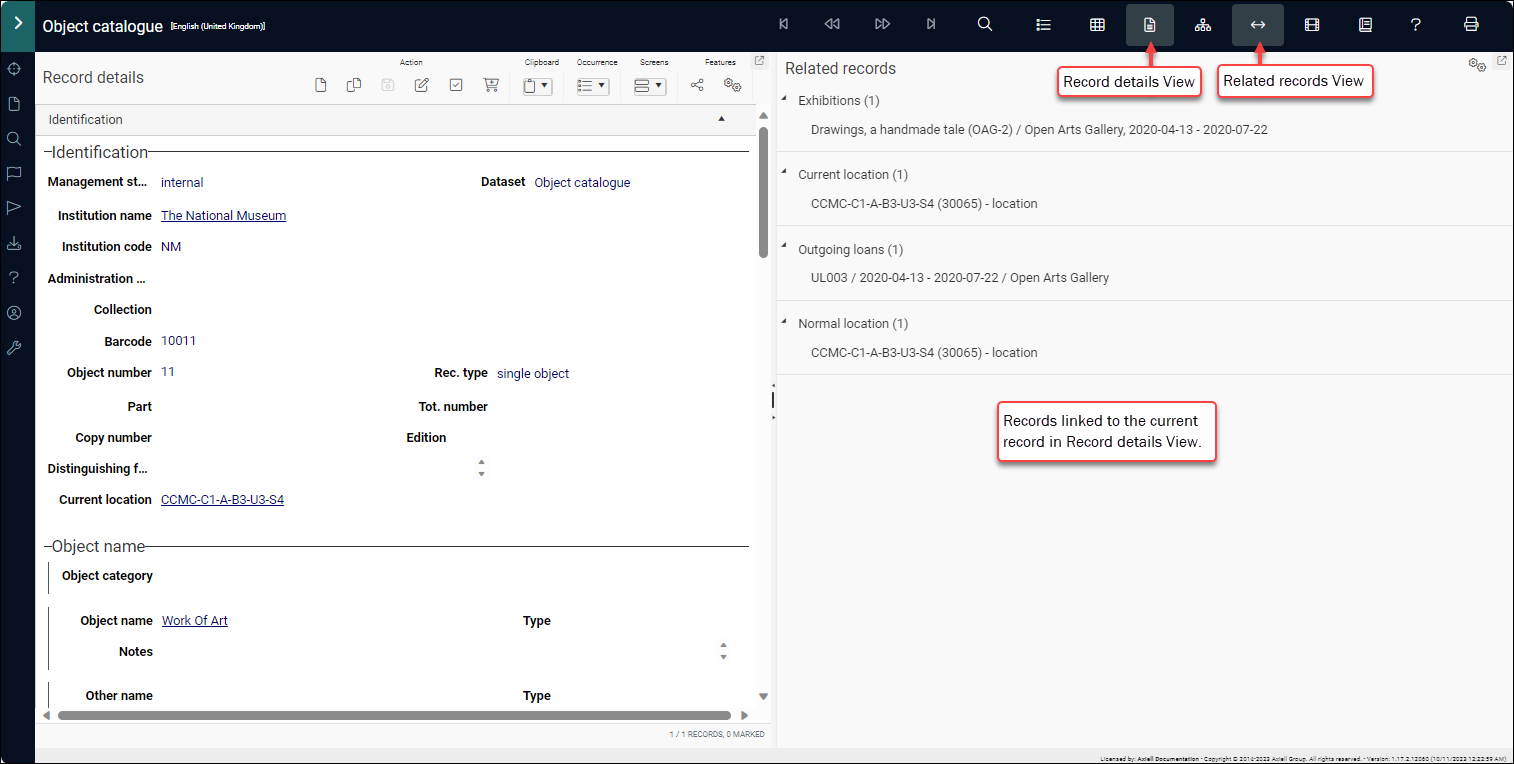
Another useful combination of Views is Record details View alongside Related records View. All available information in the current record can be viewed in Record details View, with records linked to the current record, such as loans, exhibitions, treatments, listed in Related records view:
When reading or editing data in Record details View you may find that field labels are only partially visible or that fields are too short to comfortably enter all data:
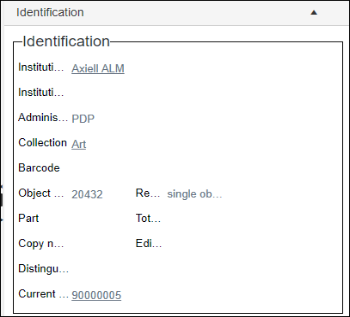
The solution is to increase the width of Record details View, and this can be achieved in a number of ways described in Working in the Collections interface (and making it work for you). Options include:
- Minimizing the Main menu
- Resizing Views
- Detaching Record details View from the main Collections window
If some field labels are still only partially visible, hover the cursor over the field label and a tooltip with the full label text will appear.

In Record details View a record is a collection of fields organized as a series of groups on panels. In Display mode![]() A record is either in Display mode (we view its details) or Edit mode (we add or edit its details). A record enters Edit mode as soon as we create a new record, copy a record in Record details View or edit an existing record. some values are underlined (these are links to other records) and some display with a lighter grey font (these values are inherited from another record or another language):
A record is either in Display mode (we view its details) or Edit mode (we add or edit its details). A record enters Edit mode as soon as we create a new record, copy a record in Record details View or edit an existing record. some values are underlined (these are links to other records) and some display with a lighter grey font (these values are inherited from another record or another language):
Working with panels
As an example, a record in Persons and institutions comprises at least six panels:
Each panel contains related fields grouped under a heading. On the Identification panel we find four groups of fields:
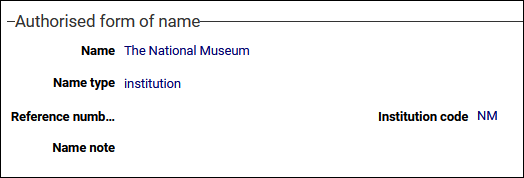
At the lowest level each of these groups consists of one or more fields. In this example, the Authorised form of name group consists of five related fields:
For each data source![]() The management of a collection can involve a vast amount of information about objects / items / books, people and organizations, events, administration and more. This information is stored as records in data sources. Each data source stores a specific type of information: details about collection items, people, events, loans, and so on. your Application Administrator specifies a default set of panels and the order in which they are stacked vertically in Record details View. In the Object catalogue shown above, there are 32 panels for the current record. You can change which panels display, as well as their order:
The management of a collection can involve a vast amount of information about objects / items / books, people and organizations, events, administration and more. This information is stored as records in data sources. Each data source stores a specific type of information: details about collection items, people, events, loans, and so on. your Application Administrator specifies a default set of panels and the order in which they are stacked vertically in Record details View. In the Object catalogue shown above, there are 32 panels for the current record. You can change which panels display, as well as their order:
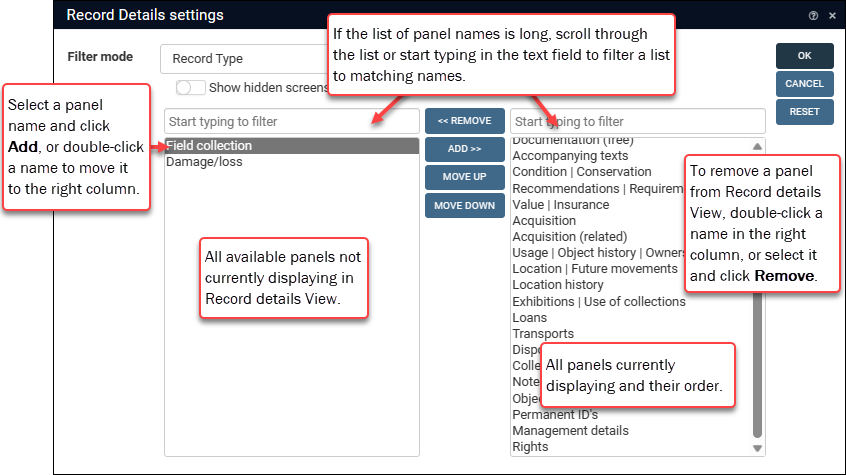
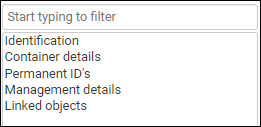
Panels are added and removed in the Record details settings box, which is accessed by selecting Settings  in the Record details View toolbar:
The column on the right lists all panels currently displaying in Record Details View; the order in which they are listed is the order in which they display. The column on the left lists all available panels not currently displaying.
To add / remove panels:
-
In the list of panels on the left:
- Scroll through the list
-OR-
- Start typing a name in the text field above the list to filter the list to matching names.
- Scroll through the list
- Select a panel in the list and click Add (or double-click the panel name) to move it to the bottom of the list in the right hand column.
Note: To select multiple panels individually (in either column), press the CTRL key as you click panel names. To select a number of consecutive panels, press and hold the SHIFT key as you click a panel and then click another panel higher or lower in the list (all panels from the first clicked panel to the second will be selected).
- Reorder the list of panels if necessary by selecting a panel in the right column and clicking Move up / Move down as required.
It is also possible to reorder panels with drag and drop in Record details View itself. This method works best when all panels are closed:
- With the cursor over the title bar of a panel, click and hold down the mouse button.
- Drag the title bar to the desired location and release the mouse button.
Changes you make to panels are associated with your user account and recalled by Collections whenever you log in.
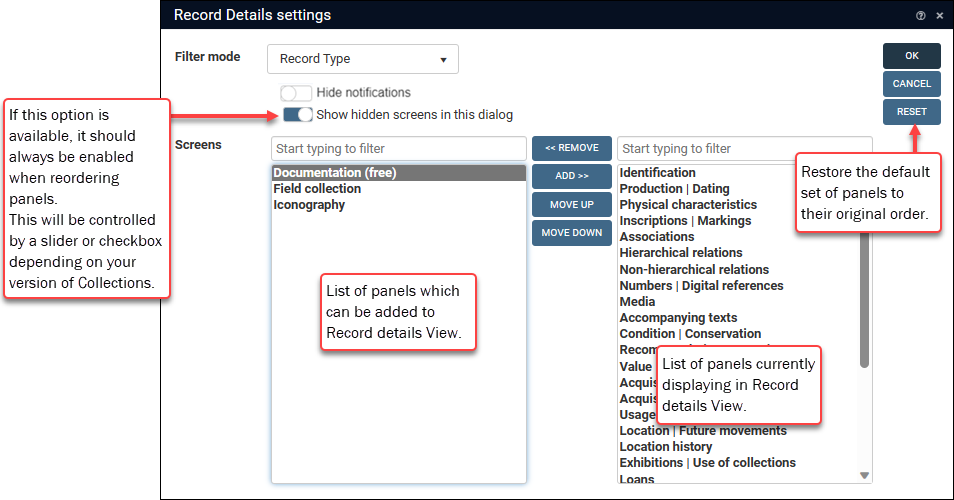
Note: It is always possible to restore the default set of panels and their order with the Reset option in the Settings box.
When working with a record it can be handy to open all panels and scroll through all available data, but often you will only want to see fields relevant to your current task (updating location details for instance). It is possible to open / close individual panels or all panels simultaneously:
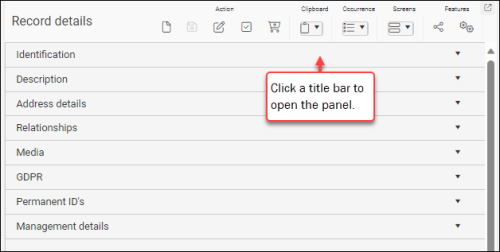
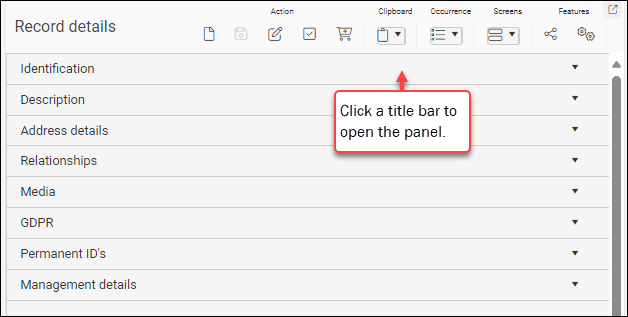
Each panel has a title bar containing a descriptive name; when a panel is closed, only its title is visible. To open a panel, click anywhere in its title bar:
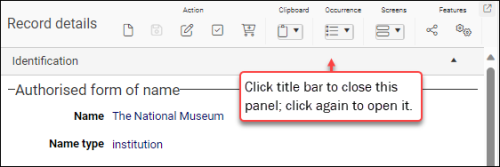
Click again to close it:
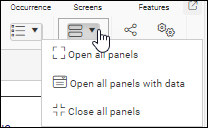
Three options are available in the Screens drop list3 for opening / closing panels simultaneously:
To open all panels:
- Click Open all panels

-OR-
Use the keyboard shortcut, ALT+<down arrow>
To open panels only if there is data in their fields:
- Click Open all panels with data

To close all panels:
- Click Close all panels

-OR-
Use the keyboard shortcut, ALT+<up arrow>

To open all panels:
- Click the toolbar button

-OR-
Use the keyboard shortcut4, ALT+<down arrow>
To close all panels:
- Click the toolbar button

-OR-
Use the keyboard shortcut, ALT+<up arrow>
Note
The only consequence of closing a panel while editing a record is that the panel's fields are hidden from view; no data is lost nor is it saved (click Save or Edit in the toolbar to save the data).
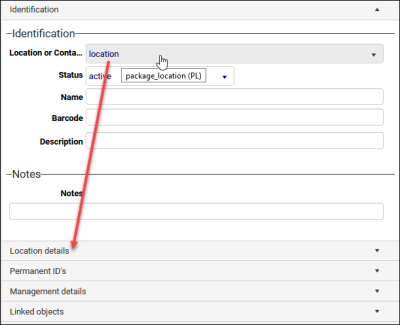
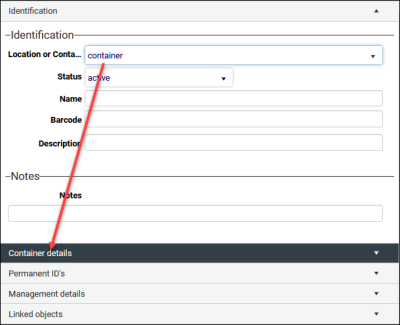
The display of some panels in Record details View is dynamic: a panel can be configured to display only when a certain condition has been met (a particular value entered in a field, for example). A good example is found in Locations and containers where the display of the Location details and Container details panels is conditional on the value entered in the package_location (PL) field:
- If package_location (PL) = location, the Location details panel displays:
- If package_location (PL) = container, the Container details panel displays:
Fields
Keyboard shortcuts are available for navigating between fields in Display and Edit mode![]() A record is either in Display mode (we view its details) or Edit mode (we add or edit its details). A record enters Edit mode as soon as we create a new record, copy a record in Record details View or edit an existing record.:
A record is either in Display mode (we view its details) or Edit mode (we add or edit its details). A record enters Edit mode as soon as we create a new record, copy a record in Record details View or edit an existing record.:
| Option | Keyboard shortcut | Details |
|---|---|---|
|
Move to the next / previous field (and panel) |
Tab / Shift+Tab |
Use Tab / Shift+Tab to move to the next / previous field on an open panel. When the first / last field on an open panel is reached, you will move to the next / previous panel header until an open panel is reached and you will again cycle through fields. |
|
Move to the next / previous instance of an occurrence |
Shift+↓ or Shift+↑ |
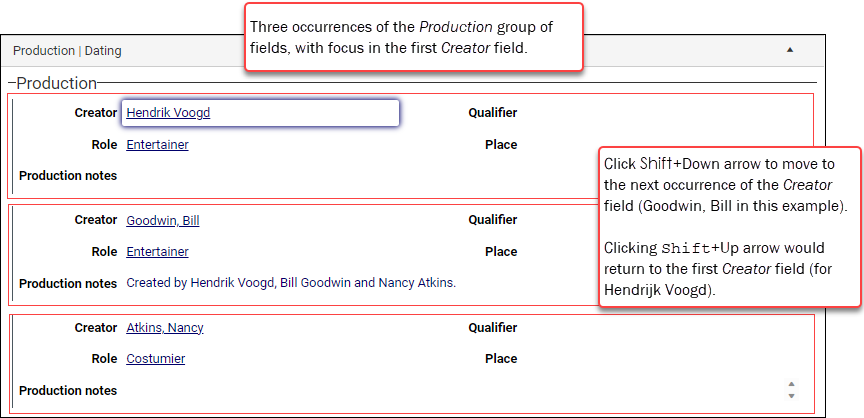
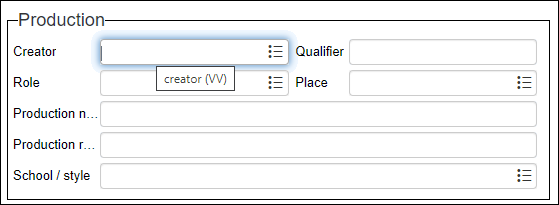
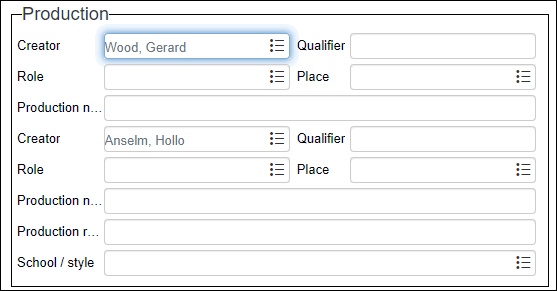
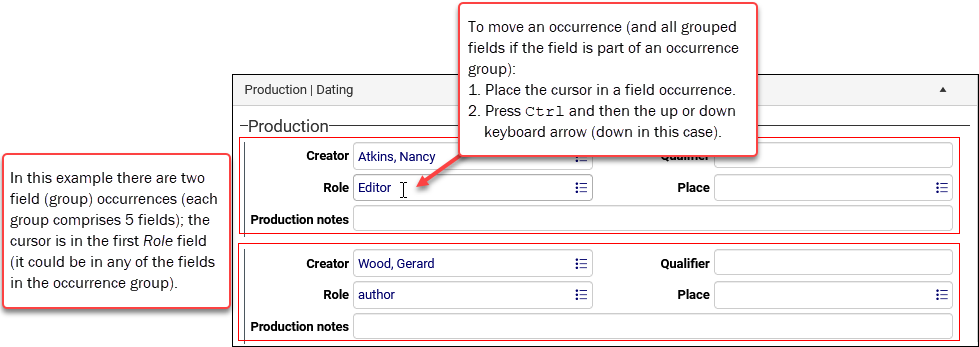
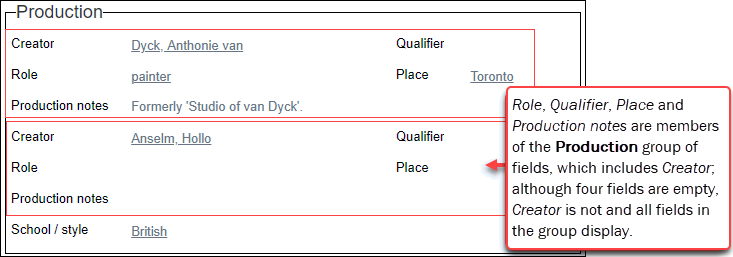
When a field occurrence is selected, use Shift+↓ or Shift+↑ to move to the next / previous occurrence of the same field. For example, if an object record has three occurrences of the Production group of fields and the Creator field currently has focus, click Shift+↓ to move to the next instance of the Creator field: If one of the Role fields had focus, using these shortcuts would move to the next / previous instance of the Role field. |
If a value is underlined in Display mode![]() A record is either in Display mode (we view its details) or Edit mode (we add or edit its details). A record enters Edit mode as soon as we create a new record, copy a record in Record details View or edit an existing record., it is in a Linked field
A record is either in Display mode (we view its details) or Edit mode (we add or edit its details). A record enters Edit mode as soon as we create a new record, copy a record in Record details View or edit an existing record., it is in a Linked field![]() A type of field used to link one record to another. A Linked field is a drop list of values (records that the field can link to). When a link is made, the field stores a reference to the linked record (a linkref). and the value is pulled dynamically from another record:
A type of field used to link one record to another. A Linked field is a drop list of values (records that the field can link to). When a link is made, the field stores a reference to the linked record (a linkref). and the value is pulled dynamically from another record:

Click the underlined value to open the linked record and view all its details.
See Linking records: an overview for details about working with Linked fields and how to link records.
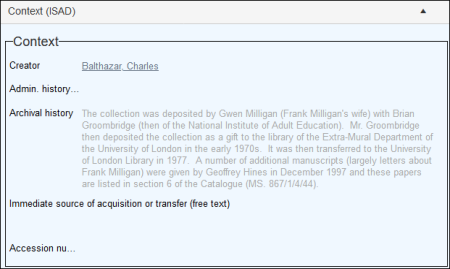
If data in a field has a dotted underline (or it is faded / lighter grey than other data in older versions of Collections6), the value has been inherited in one of two ways:
Where records can be arranged in a hierarchy, a field can be configured to be inherited so that a record lower in the hierarchy inherits a value entered in a record immediately higher in the hierarchy (its parent). This can be efficient as a value only needs to be entered and saved in the parent record to be inherited by all of its children; importantly, while the value displays in a child record it is not stored in that record (in the child record the field is actually empty until the field is edited and the inherited value is overwritten).
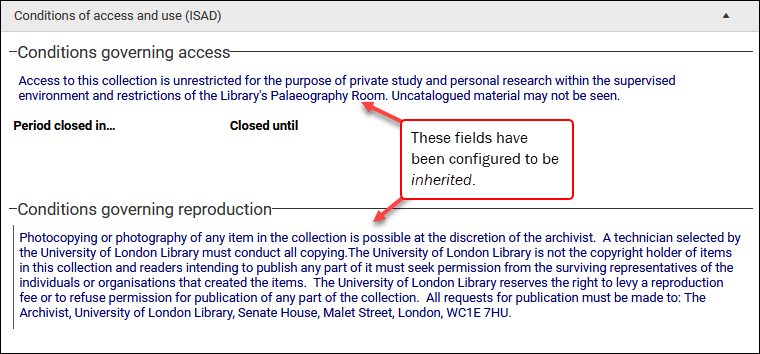
In the following example, the Conditions governing access and Conditions governing reproduction fields are configured to be inherited and data has been added to both fields in a parent record:
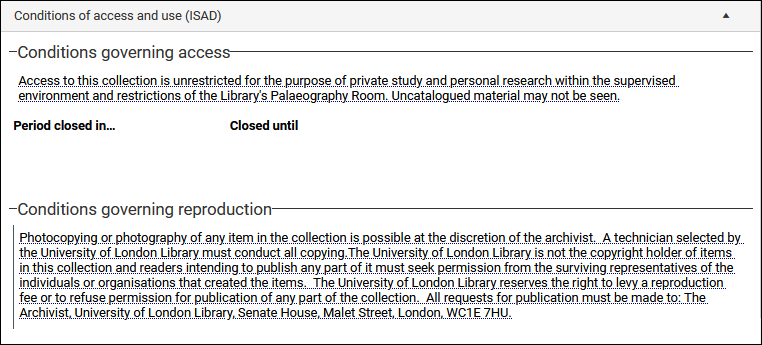
When we view a record lower in the hierarchy, the values from the parent record are displayed in these two fields but with a dotted underline to indicate that they have been inherited:
In older versions of Collections an inherited value is a lighter grey than other data. Here we see the Archival history field in a parent record:
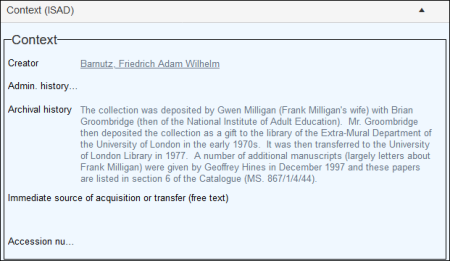
When we view a record lower in the hierarchy, the Archival history value is faded to indicate that it has been inherited:
An inherited value can be edited or deleted in the current record![]() The record currently displayed in Record details View or highlighted (with a solid background) in Result set View or Gallery View for instance.. Here we see the Conditions governing reproduction field in Edit mode in a child record:
The record currently displayed in Record details View or highlighted (with a solid background) in Result set View or Gallery View for instance.. Here we see the Conditions governing reproduction field in Edit mode in a child record:
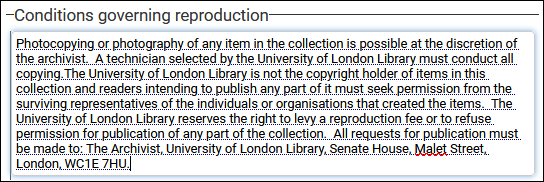
The value can be deleted entirely, or edited / rewritten. When you edit the record and add a value to an inherited field, the new value will not be underlined / faded as, of course, it is no longer inherited:

Tip: If you delete or edit an inherited value in a child record, it can be restored by right-clicking the field in Edit mode and selecting Restore inheritance from the context menu that displays.
In summary, when data in a field has a dotted underline (or it is faded / lighter grey than other data), it is displayed in the field but not saved in the current record. When you edit the field, the edited value is saved in the current record.
In a multilingual system it is possible to specify at the system level that a language is an Invariant; it is also possible to set an invariant language manually on individual fields. In either case, values in the Invariant language will display for every other available language until a translation has been added. Specifying invariancy ensures that a value is available when records are viewed in every available language even if the value has not yet been translated, and it serves as an aid for translation.
In this example, English has been set as the Invariant language at the system level, and the title of a book has been added in English:

The value has not been translated into French and when the data language has been switched to French, the English value displays as faded text to indicate that it is an invariant value:

When the data language is French and the value is translated, the new value will not be faded.
See Working in multilingual systems for details.
If a field includes a flag, it is a multilingual field:

Prior to Collections version 1.11, the Edit multilingual texts  icon appears in the Record details View toolbar:

The icon is disabled until the cursor is in a (non-linked) .
The icon was removed from the toolbar and included in multilingual fields to make it easier in Edit mode to identify whether a field can hold multilingual data.
Depending on your version of Collections, click the Edit multilingual texts icon in the Record details View toolbar or the Edit multilingual texts flag in a field to open the Multilingual Data box in which you can view and edit data in all available languages for this multilingual field.
Details about working with multilingual fields can be found here.
Functionality and customization
The Record details View toolbar sits below the top Toolbar and contains functions for working with the current record![]() The record currently displayed in Record details View or highlighted (with a solid background) in Result set View or Gallery View for instance. or creating a new record:
The record currently displayed in Record details View or highlighted (with a solid background) in Result set View or Gallery View for instance. or creating a new record:

A record is either in Display mode (we view its details) or Edit mode. When we copy a record, create a new record or edit an existing record in Record details View, the current record enters Edit mode.
Notes
- Some of these functions may not be available in your system, or you may not be authorized to use them (speak to your Application Administrator if you require access to these functions).
- Some options will be inactive until you start editing a record.
| Option | Icon | Keyboard shortcut | Details | |||||||||||||||||||||||
|---|---|---|---|---|---|---|---|---|---|---|---|---|---|---|---|---|---|---|---|---|---|---|---|---|---|---|
|
|
ALT+N |
See How to add, edit and save records for full details. |
||||||||||||||||||||||||
|
|
SHIFT+F5 |
Create a copy of the current record From Collections version 1.11 onwards Application Administrators control the availability of the Copy record function per data source The Exchangeable property in the data dictionary is used to determine whether the value in a field can be copied to a new record. To copy-protect a field (so that its value is not copied to a new record), simply do not enable (tick) the Exchangeable checkbox. Details here. With this option, authorized users create a copy of the current record and open it in Edit mode. Behind the scenes, the new record receives a unique identifier (priref In all other ways the new record is identical to the copied record. Edit the record as required (full details about how to edit records can be found here) and save the record. Keep in mind that values in unique fields such as object_number (IN) may have been copied to the new record and it will be necessary to change them before saving the record (if you try to save the record without changing them, a message will display indicating which field must be updated). |
||||||||||||||||||||||||
|
|
|
Save the current record Tip: If the Save button does not display, the Edit button is used both to edit and then save a record. Select Save to save all changes made to the record and return to Display mode When using the Save button, the Save Prompt does not display: you are not asked to confirm that you want your changes saved and you do not have an option to cancel your changes. For those features, use the Edit button instead. Alternative method: with Save Prompt An alternative method for saving the record is to use the Edit button
Select:
|
||||||||||||||||||||||||
|
|
F11 |
Edit the current record See How to add, edit and save records for full details. |
||||||||||||||||||||||||
|
Mark / unmark record7 |
|
SHIFT+F4 |
Mark / unmark the current record. A record can be marked One or more records can be marked in Record details View. Marking / unmarking a record in one View, marks / unmarks it in every other View (i.e. as you mark a record in Record details View, the checkbox in Result set View is marked). To mark the current record:
When a record is marked, the icon appears recessed:
Reverse the selection by clicking the icon or using the keyboard shortcut. The number of marked records is shown in the Status bar in Record details View and also Result set View:
|
|||||||||||||||||||||||
|
|
F10 |
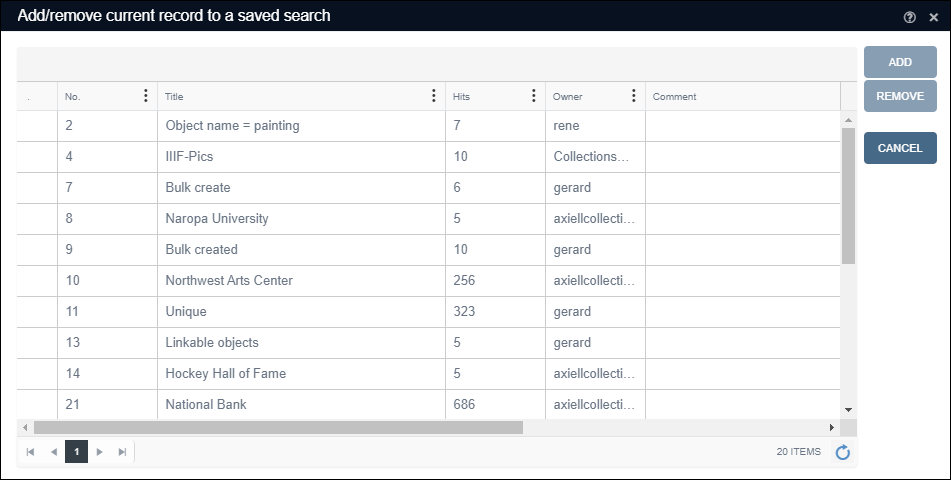
Add the current record With the Write set option in Result set View and Gallery View it is possible to save records as a group and restore the group of records at any time. The Manage saved searches option in Record details View allows you to add the current record to, or remove it from, an existing group. The box that opens when To add / remove the current record to / from a group:
Note There are two types of group in Collections:
When you add / remove a record to / from a group, the group becomes Static and it is no longer possible to re-run the group or include it in a schedule. This is explained here. Note: The Manage saved searches option in Result set View and Gallery View has additional features not available in Record details View. Full details about Write set and Manage saved searches can be found here. |
||||||||||||||||||||||||
|
Record templates8 |
|
|
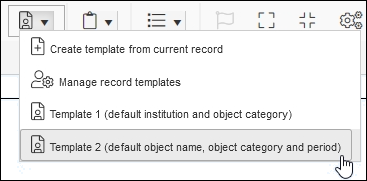
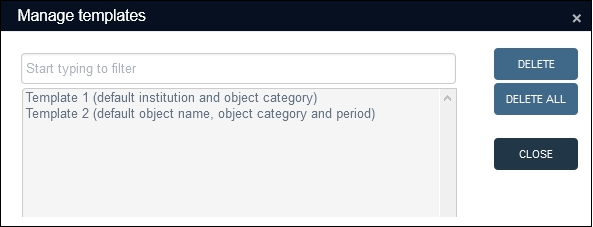
Create one or more record templates from a new or existing record; and create a new record based on a record template. From Collections version 1.11 onwards Application Administrators control the availability of the Record templates function per data source With this function it is possible to create a record template based on a new or existing record containing base (common) data; instead of creating a blank record, it is then possible to create a new record with the common data. This can be useful if you are about to create a series of records that contain some common data (institution name, description level, the same domain or title, for instance). Multiple record templates can be created in each data source
To create a record based on a record template, select a template from the Record templates drop list:
A new record will open in Edit mode based on the record template. Edit and save the record. |
|||||||||||||||||||||||
|
|
|
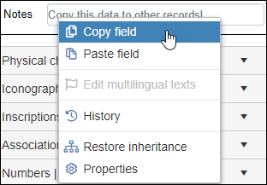
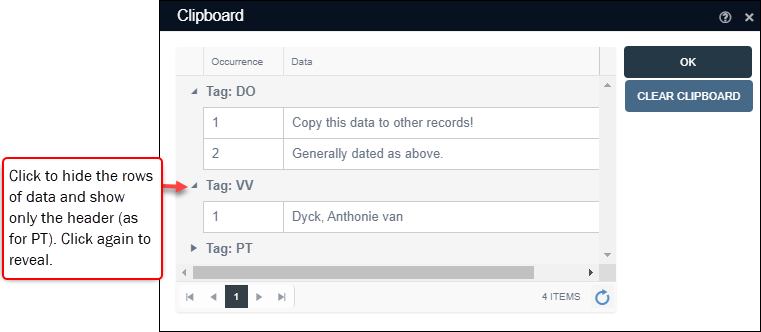
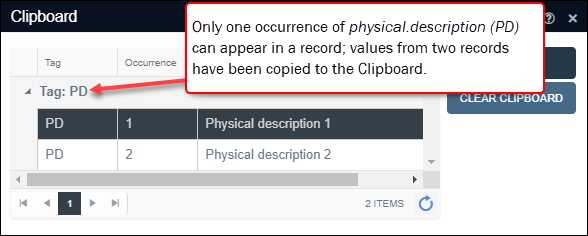
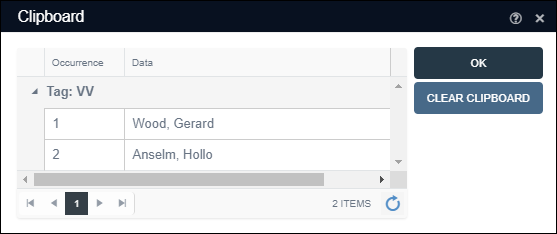
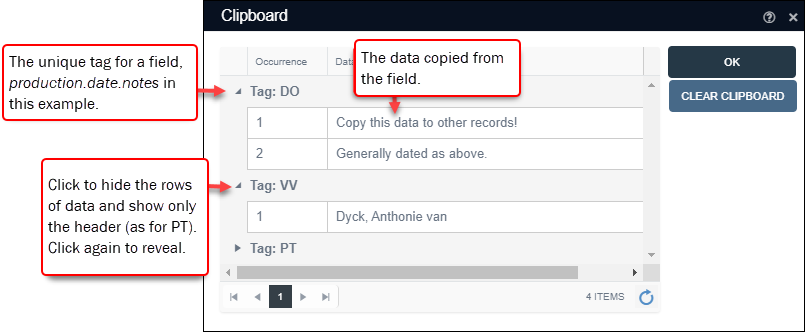
Copy data in a field and paste it to the same field in other records. The Collections clipboard, which operates independently from the Windows clipboard, can store the contents of different fields simultaneously: when you use the Copy field option, a field's content is saved to the Collections clipboard and associated with the field's unique tag
It is possible to store multiple values for the same field (multiple creators or authors for instance). In this case, each value is stored as an occurrence Note
Four options are available from the Clipboard drop list:
|
||||||||||||||||||||||||
|
|
|
In Edit mode If a field can have more than one value (it is repeatable), we add an occurrence of the field for each value (e.g. a book can have multiple authors so we add an occurrence of the author.name (au) field for each author). An occurrence can be a member of a group of fields, and adding an occurrence of the field adds all members of the group at once. Full details about field occurrences can be found here. The Occurrence drop list has five options, which are enabled when a record is being edited and the cursor is in a repeatable field:
|
||||||||||||||||||||||||
|
|
CTRL+M |
Multilingual systems prior to Collections version 1.11 include an Edit multilingual texts icon in the Record details View toolbar:
With the cursor in a multilingual field in Edit mode, click The icon was removed from the toolbar and included in multilingual fields to make it easier in Edit mode to identify whether a field can hold multilingual data. Details about working with multilingual fields can be found here. |
||||||||||||||||||||||||
|
|
ALT+<down arrow> ALT+<up arrow>14 |
Open / close panels simultaneously. Each panel has a title bar containing a descriptive name; when a panel is closed, only its title is visible. To open a panel, click anywhere in its title bar:
Click again to close it:
Three options are available in the Screens drop list15 for opening / closing panels simultaneously:
To open all panels:
To open panels only if there is data in their fields:
To close all panels:
To open all panels:
To close all panels:
Note The only consequence of closing a panel while editing a record is that the panel's fields are hidden from view; no data is lost nor is it saved (click Save or Edit in the toolbar to save the data). |
||||||||||||||||||||||||
|
|
|
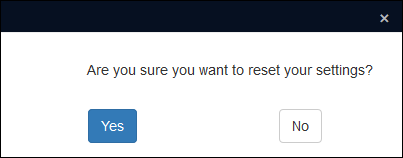
Configure Record details View settings, in particular which panels display, and their order. Your Application Administrator specifies a default set of panels to display details from the current record, as well as the order in which the panels display for each data source It is also possible to specify that fields with no data do not display in Record details View. Any changes you make are associated with your user account and recalled by Collections whenever you log in. You can restore the View's default settings by selecting Reset. A message will ask you to confirm the reset:
Tip: An option in the Main menu enables you to restore ALL settings you have changed across Collections back to their default. The Reset option in the Record Details settings box only affects this View's settings. The following options are available in the Record Details settings box: The Filter mode drop list provides options to limit which fields are visible in Record details View when viewing and editing records. In some data sources
In data sources that include a Record type field, the options in the Filter mode drop list are Record type and Has Data:
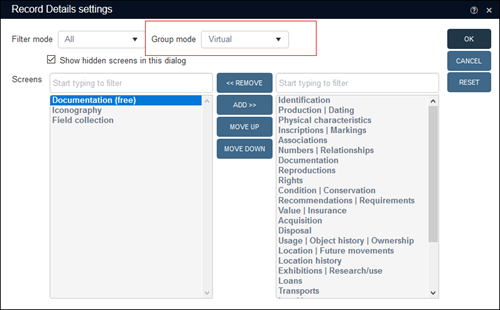
The Group mode option is available in versions of Collections prior to Version 1.12.117:
Opening a record that is linked to many other records can be slow as all links are resolved before the record is displayed. This is usually only a problem with a small number of linked fields. For example, the Parts field group on the Context (ISAD) panel in Archive (catalogue) records includes parts.reference (nt); in a large archive this field group can have hundreds of occurrences A solution is to configure such repeated field groups to display as a table: details of linked records are then displayed as paged or scrolled results and rather than retrieving all linked records at once, they are retrieved in smaller groups (one page at a time, or as you scroll through the results). When repeated field groups have been configured to display as a table, you have the choice to display results as a scrollable list (Virtual) or in pages (Paged):
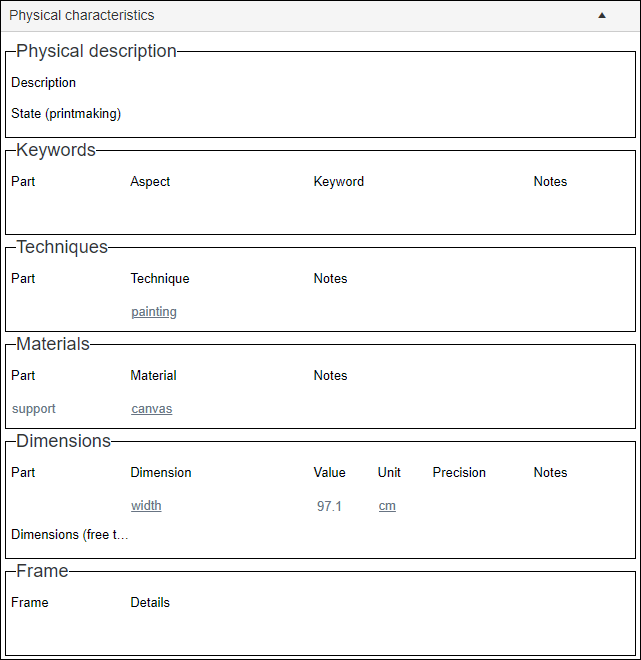
This option is available when there are conditional panels (aka screens) in the current data source Tip: This option should almost always be selected when reordering panels. When this option is enabled, all panels you are authorized to access are listed in the Record Details settings box and you are able to reorder them as required. A panel can be configured to display only when a certain condition has been met: a particular value has been entered in a field, for instance. A good example is found in Locations and containers where the display of the Location details and Container details panels is conditional on the value entered in the package_location (PL) field:
When we open the Record Details settings box in the Locations and containers data source, we find: The right column lists all panels that currently display in Record details View. This includes any conditional panels when the condition for display has been met. In this case, package_location (PL) = location, and we find that the Location details panel is listed. If package_location (PL) was container, we would find the Container details panel listed:
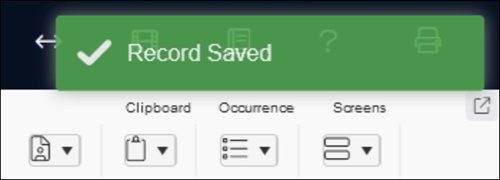
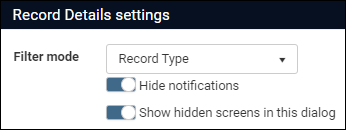
When the Show hidden screens in this dialog option is enabled, all conditional panels display regardless of current conditions: In summary, when the Show hidden screens in this dialog option is enabled, all panels you are authorized to access are displayed and you are able to reorder them as required. Important: if you remove a conditional panel from the right column of the Record Details settings box, it will not display in Record details View when its condition has been met! Pop-up notifications are used throughout Collections in response to actions you perform, such as saving a record:
The notification displays for about eight seconds and overlays a number of Toolbar icons for the duration; clicking the notification will cause it to disappear immediately, but you may consider this an unnecessary distraction or prefer not to receive such notifications at all (perhaps you are undertaking high volume data entry and the notification is constantly in the way of the Toolbar). Drag the Hide notifications slider18 to hide all informative messages (those with a green or blue background):
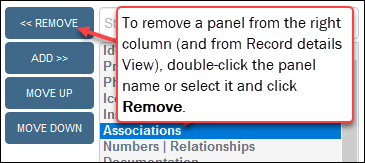
Warnings (notifications with an orange background) and Errors (those with a red background) will always display when required as they require some action on your part. The column on the right lists all panels (aka Screens) currently displaying in Record Details View; the order in which they are listed is the order in which they display. The column on the left lists all available panels not currently displaying. To add panels:
To remove panels:
|
||||||||||||||||||||||||
|
Deep link19 |
|
|
Copy a link to the current record Copying and sharing a link to the current record A message confirming that the link has been copied to the Windows clipboard will display in the right upper corner of the browser window:
The link can now be pasted and shared. Note: The link will not work if you paste it into the Address bar of a browser tab that is already running Collections. When a user clicks the link in an email etc., Collections will always open in a new tab. |
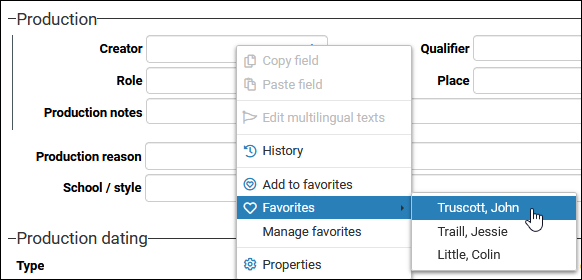
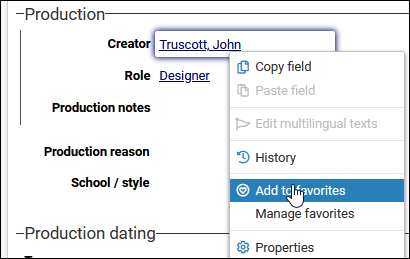
Right-click a field to access a context menu with several functions available in the Record details View toolbar and a number of additional functions:
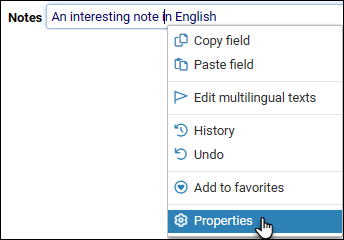
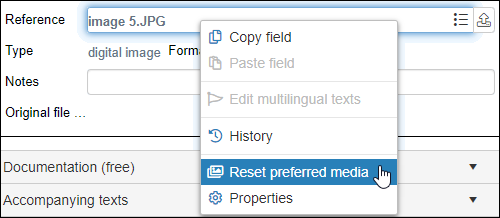
Which options are available will depend on whether you are in Display or Edit mode![]() A record is either in Display mode (we view its details) or Edit mode (we add or edit its details). A record enters Edit mode as soon as we create a new record, copy a record in Record details View or edit an existing record., as well as the type of field. A media field includes additional options for instance20:
A record is either in Display mode (we view its details) or Edit mode (we add or edit its details). A record enters Edit mode as soon as we create a new record, copy a record in Record details View or edit an existing record., as well as the type of field. A media field includes additional options for instance20:
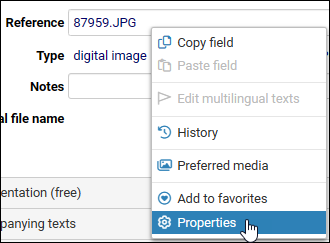
| Option | Details | ||||||||||
|---|---|---|---|---|---|---|---|---|---|---|---|
|
Copy / Paste field |
In Display or Edit mode, copy data in a field to the Collections Clipboard and paste it to the same field in other records in Edit mode. These two options are also available from the Clipboard drop list in the Record details View toolbar. Details here. |
||||||||||
|
Edit multilingual texts |
With the cursor in a multilingual field in Edit mode, open the Multilingual Data box and edit data in every available language. This option is also available in the Record details View toolbar in Versions of Collections prior to 1.11. Details here. |
||||||||||
|
History |
A history of every change to a record is maintained and accessible to authorized users who are able to review changes and restore records to an earlier state if required. Details here. |
||||||||||
|
Undo21 |
Undo changes to a field and restore the last saved value. Note: Use this option BEFORE saving the record. Notes:
|
||||||||||
|
Where records can be arranged in a hierarchy (of parent / child records), a field can be configured as inherited so that a record lower in the hierarchy inherits a value entered in a record higher in the hierarchy. If a value has been inherited, it has a dotted underline (or it is faded / lighter grey than other data in older versions of Collections22). More details above. It is possible to edit or delete an inherited value in the current record |
|||||||||||
|
Display the list of values saved as favourites for the current field, select a value and copy it to the field. This option only displays in the context menu when a value has been added to the favourites list for the current field using the Add to favourites option. When one or more values have been saved as favourites for the current field (using the Add to favourites option), a value can be selected from the list and copied to the field when editing a record. This can be useful if the same value (term, name, date, etc.) is entered into a field as it can be selected from the favourites list rather than being keyed into the field. To copy a favourite value to a field when editing a record:
The value is copied to the field and will overwrite any value already entered in the field. Note: If a value is cut off in the list because it is too long, you can select Manage favourites to view the full value. |
|||||||||||
|
Add a value to a list of favourites for the current field. In Display or Edit mode
The value is added to a list of favourites for the current field, and from there it can be selected and added to a field when editing a record. If this is the first value saved to the favourites list for this field, two options are added to the context menu: Favourites and Manage Favourites. A favourite is saved:
|
|||||||||||
|
With the Manage favourites option it is possible to change the order of values in the list of favourites for the current field, delete a value from the list, remove all values from the list, and view the complete text of a value. This option only displays in the context menu when a value has been added to the favourites list for the current field using the Add to favourites option. Select this option to display the Manage favourites box: Here it is possible to:
|
|||||||||||
|
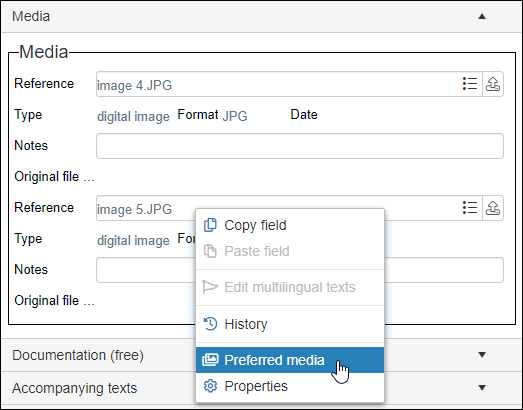
Preferred media23 |
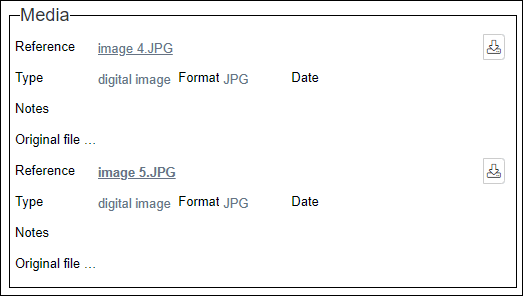
When more than one media file has been linked to a record, it is possible to mark one media file as preferred if you have WRITE or FULL access to the record. A preferred image will be shown first in Media viewer instead of the image in the first field occurrence In Edit mode
When the record is saved the reference will be bold to indicate its preferred status:
There can be only one preferred media reference per record. To remove the preferred status, edit the record and either:
|
||||||||||
|
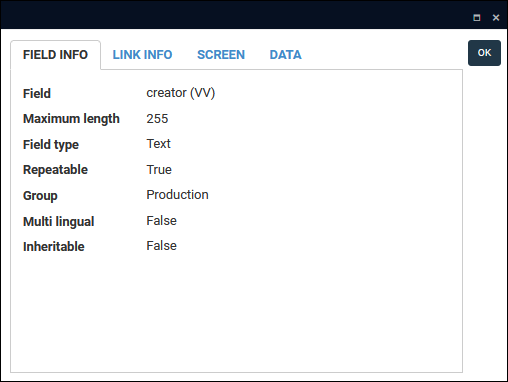
Provides access to the Field properties box with details about the properties of a field and the data it contains: Details here. |


















 button in the Result set View and Record details View toolbars.
